Wednesday, February 20, 2013

How to implement a 'MailTo' Link (html format) in a calculated Column in SharePoint List

For example if you want to show an email link if the category (another column value say AppType) is 'On-Request', and by clicking on that you can open an outlook window to send a request email. 
But you don't want to show the full 'href' link instead just a text "Request" with an html link that will trigger the email. In that case you can use the following method. 

Create a calculated column (say 'Request' for request email). 

Add a content editor web part to the list page and add the following JavaScript. 


<SCRIPT type=text/javascript>
if(typeof jQuery=="undefined"){
var jQPath ="http://ajax.googleapis.com/ajax/libs/jquery/1.3.1/";
document.write("<script src='",jQPath,"jquery.min.js' type='text/javascript'><\/script>");
}
</SCRIPT>

<SCRIPT type=text/javascript>
$(document).ready(function(){
$(".ms-vb2:contains('<DIV')").each(function(){
var tempDIV = document.createElement ("DIV");
tempDIV.style.cursor = "pointer";
tempDIV.innerHTML = $(this).text();
$(this).text("");
$(this).append(tempDIV);
});
});
</SCRIPT>

Now give the following code as value for the calculated column you created: 

=IF([App Type]="On-Request","<DIV><a href='mailto:dinoop@website.com?Subject=Testing'>Request</a></DIV>","")

Now you can see column values as html links. 
The JavaScript function will convert the text to html wherever it finds the 'DIV' tag. 

Tuesday, January 8, 2013

Creating Custom Timer Job in SharePoint 2010

CODE

Open Visual Studio 2010 >File > New >Project >SharePoint 2010>Empty SharePoint Project. >Name it Custom_TimerJob>Ok

Check Deploy as farm solution>Finish

create a class that inherits from the Microsoft.SharePoint.Administration.SPJobDefinition class. To implement this class, you need to create a few constructors and override the Execute() method as following
 
namespace DotnetFinder
{
    class ListTimerJob : SPJobDefinition
    {
         public ListTimerJob()

            : base()
        {

        }

        public ListTimerJob(string jobName, SPService service, SPServer server, SPJobLockType targetType)

            : base(jobName, service, server, targetType)
        {

        }

        public ListTimerJob(string jobName, SPWebApplication webApplication)

            : base(jobName, webApplication, null, SPJobLockType.ContentDatabase)
        {

            this.Title = "List Timer Job";

        }

        public override void Execute(Guid contentDbId)
        {

            // get a reference to the current site collection's content database

            SPWebApplication webApplication = this.Parent as SPWebApplication;

            SPContentDatabase contentDb = webApplication.ContentDatabases[contentDbId];

            // get a reference to the "ListTimerJob" list in the RootWeb of the first site collection in the content database

            SPList Listjob = contentDb.Sites[0].RootWeb.Lists["ListTimerJob"];

            // create a new list Item, set the Title to the current day/time, and update the item

            SPListItem newList = Listjob.Items.Add();

            newList["Title"] = DateTime.Now.ToString();

            newList.Update();

        }
}
}
As you can see this job just add a new item to a ListTimerJob list every time it’s executed
Now that you have the job built> Right click on the Features >Add Feature

Right click on the Feature1 ” you can rename the Feature1 to any name” > Add Event Receiver

As you can see the event Receiver class inherits from the Microsoft.SharePoint.SPFeatureReceiver and This class handles events raised during feature activation, deactivation, installation, uninstallation, and upgrade. But we only need FeatureActivated & FeatureDeactivated event handler to install/uninstall our custom timer job as following
namespace DotnetFinder.Features.Feature1
{
[Guid("9a724fdb-e423-4232-9626-0cffc53fb74b")]
public class Feature1EventReceiver : SPFeatureReceiver
    {
        const string List_JOB_NAME = "ListLogger";
        // Uncomment the method below to handle the event raised after a feature has been activated.

        public override void FeatureActivated(SPFeatureReceiverProperties properties)
        {
            SPSite site = properties.Feature.Parent as SPSite;

            // make sure the job isn't already registered

            foreach (SPJobDefinition job in site.WebApplication.JobDefinitions)
            {

                if (job.Name == List_JOB_NAME)

                    job.Delete();

            }

            // install the job

            ListTimerJob listLoggerJob = new ListTimerJob(List_JOB_NAME, site.WebApplication);

            SPMinuteSchedule schedule = new SPMinuteSchedule();

            schedule.BeginSecond = 0;

            schedule.EndSecond = 59;

            schedule.Interval = 5;

            listLoggerJob.Schedule = schedule;

            listLoggerJob.Update();

        }

        // Uncomment the method below to handle the event raised before a feature is deactivated.

        public override void FeatureDeactivating(SPFeatureReceiverProperties properties)
        {
            SPSite site = properties.Feature.Parent as SPSite;

            // delete the job

            foreach (SPJobDefinition job in site.WebApplication.JobDefinitions)
            {

                if (job.Name == List_JOB_NAME)

                    job.Delete();

            }

}

   }

Before Deploying you should select the right scope of the Feature in other words in which scope you will activate the Feature(Farm,Site,Web,WebApplication) in our case we will activate Feature1 on Site which is mean Site Collection.

Note : if you trying to activate the feature in the wrong scope will get the following error

Now let us deploy our custom timer job >Right Click on Custom_TimerJob project > Click Deploy

Open now your SharePoint site and select ListTimerJob List and you should see something similar to the following image


Our custom timer job is working fine now you can go and check it and modify the schedule as following
Go to SharePoint 2010 central administration >Monitoring >in the Timer Jobs Section Select Review Job Definitions
and you should See our Custom Timer Job

Click on it and you should see Edit Timer Job Page ,Modify Timer Job schedule based on your requirement
Note : you can also modify schedule of your custom Timer Job from the code but you need to add one of the following class in FeatureActviated Event Handler as following

After Specific Minutes use SPMinuteSchedule class
Hourly use SPHourlySchedule class
Daily use SPDailySchedule class
Weekly use SPWeeklySchedule class
Monthly use SPMonthlySchedule class

Configuring Sharepoint 2010 to Accept Incoming Emails


Wouldn’t it be nice to create a list, announcement or a document respository automatically by sending email to Sharepoint Server, whats even better is that you can run a logic behind it by using worklflow and automate business processes as well. A good example would be a service request or a project request where it originates from an email and depending on the contents of the email it filters it out and assigns task to different departments. Well before all of that happens you need to configure Sharepoint first to accept incoming emails and here is a simple way to do it and it only involves 8 easy steps so lets get starting.

1. Add SMTP Feature to your Sharepoint Server

To do that go to your Server Manager by going to Start->Administrative Tools->Server Manager or just type “Server Manager” in the search box. Once in the server manager go to features, then in feature summary click “Add Features”.

Select “SMTP Server” and click “Add Required Role Services”.

2. Install IIS 6 Management Console

Since SMTP Management still uses the old MMC UI you need to install the IIS 6 Management Console, to check whether its installed go to Server Manager->Roles->Web Server(IIS) then under the Role Services you will see whats installed, if its not there then click “Add Role Services”.

Choose the required IIS 6 Management Components, and confirm installation.

Once installed you should see it under Administrative Tools->Internet Information Services (IIS) 6.0 Manager.

3. Setup your SMTP Server

Knowing that Internet Information Services (IIS) 6.0 Manager is installed click on it and start setting up your SMTP.
Go to the SMTP Virtual Server, right click on it and choose properties.

Go to Access then setup Authentication, make sure Anonymous Access is checked then click OK.

Now click Connection, choose “All except the list below” then click OK.

Finally click relay choose “Only the list below” and make sure the item “Allow all computers which successfully authenticate to relay, regardless of the list above” is checked. Click OK then Apply.

4. Take note of where the Email Drop Folder is located

This will be the location where an email message is dropped of first before processing. To go there just below “SMTP Virtual Server” you will see “Domains” and right click on the Domain Name of your server the select properties.

5. Check if SMTP service is running

To check if your SMTP Service is runing type “services.msc” in run command, once Serices Console loads go to “Simple Mail Transfer Protocol (SMTP)”, double click the entry and make sure Startup Type is “Automatic” and start the service. Click Apply and OK.

6. Configure incoming e-mail settings in Sharepoint 2010

Now go to your Sharepoint Central Administration. Once there go to System Sttings->Configure incoming e-mail settings.

Configure the following options:
  • Enable sites on this server to receive e-mail? -> Yes
  • Settings mode: -> Automatic
  • Use the SharePoint Directory Management Service to create distribution groups and contacts? -> No
  • E-mail server display address: -> YOURSERVER.yourdomain.com, this is the default
  • Safe E-Mail Servers -> Accept mail from all e-mail servers

Click OK and it processes on the background and of of the processes involved is setting up security properties on the Drop Folder which I mentioned on step 4, sometimes that fails (very rarely this happens) so it best to check if that indeed worked by going to the Security Properties of the Drop Folder.
Make sure the security properties are such:
  • WSS_Admin_WPG – Full Control
  • WSS_WPG – Read & Execute / List folder Contents / Read

7. Configure your Sharepoint List Incoming e-mail settings

Now configure your list to accept that emails, to do that choose a list (It will only work on some list types), Calendar or Document Library then go to Communications->Incoming e-mail settings.

Then set up the following
  • Allow this list to receive e-mail? -> Yes
  • E-mail address: > The email address you want, this will be automatically routed once it hits the domain so no need to create it on Exchange
  • Save e-mail attachments? -> Yes, if you want to
  • Save original e-mail? -> Yes, if you want to
  • Save meeting invitations? -> Yes, if you want to
  • E-mail security policy: -> Accept e-mail messages from any sender

Click OK, now your all done, all you have to do it test.

8. Testing Time

Send and email to the one you configured on step 7

Check the Drop Folder mentioned in Step 4 and an email (.eml) file will be there while its being processed.

Once it disappread check your list and the email should be there.

 Event Handler Example

Requirement: In a Project collaboration SharePoint site, had a requirement to Allow users to upload only PDF files to a Document library and prevent all other files from being uploaded.

Solution: Our requirement is basically to prevent files being uploaded other than PDF, Isn't it? So lets jump to visual studio and create a Event Receiver in SharePoint to prevent all other file types.

How to Create a Event Receiver in SharePoint 2010?
Compared with MOSS 2007, Creating Event receivers in SharePoint 2010 is very easy With Visual Studio 2010. Here are the steps:

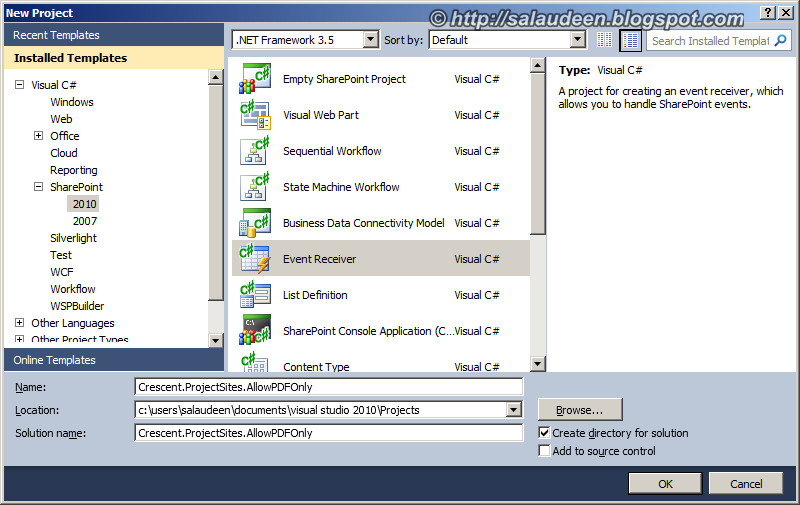
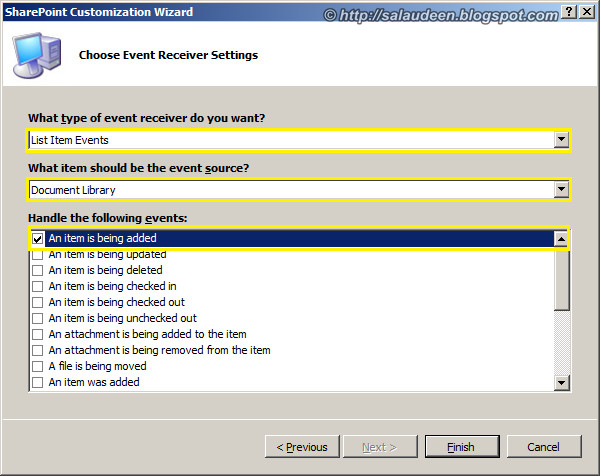
1. Create a New Visual Studio Project, Choose SharePoint >> 2010 >> Event Receiver >> Give it a Name. Say "Crescent.ProjectSites.AllowPDFOnly"

2. Make it as a Farm solution, choose the event receiver properties as in the below screen.

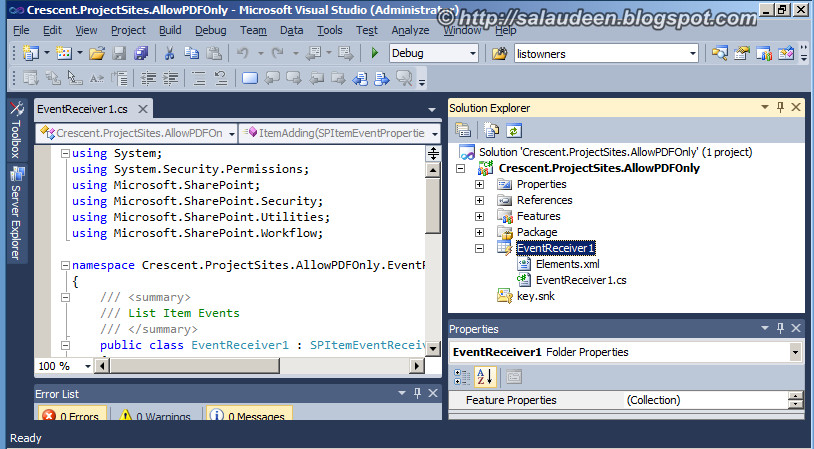
3. On clicking "Finish" button, Visual Studio will create the project structure as:

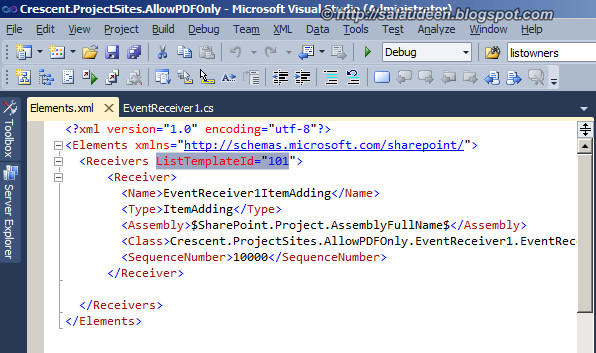
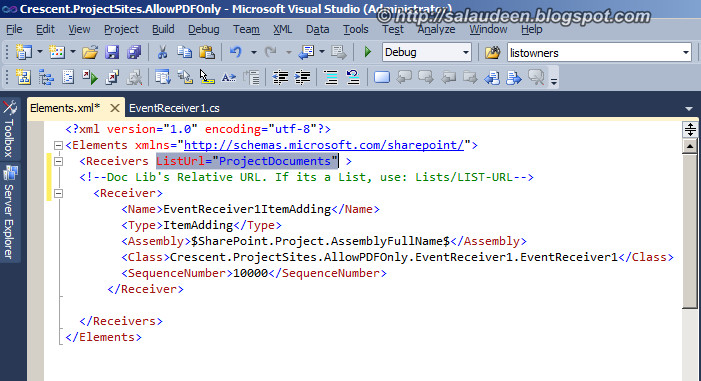
4. Now, in the Elements.xml file, change the ListTemplateID="101" (Which means all document Libraries) to ListURL="RelativePathOfDocLibrary" say: ProjectDocuments.

Change the <Receivers attribute
5. Update the Event receiver ItemAdding section's code as below:

?
1
2
3
4
5
6
if (!properties.AfterUrl.EndsWith("pdf"))
            {
                properties.ErrorMessage = "You are allowed to upload only PDF Files!";
                properties.Status = SPEventReceiverStatus.CancelWithError;
                properties.Cancel = true;
            }


So, The complete code would be:
?
1
2
3
4
5
6
7
8
9
10
11
12
13
14
15
16
17
18
19
20
21
22
23
24
using System;
using System.Security.Permissions;
using Microsoft.SharePoint;
using Microsoft.SharePoint.Security;
using Microsoft.SharePoint.Utilities;
using Microsoft.SharePoint.Workflow;
 
namespace Crescent.ProjectSites.AllowPDFOnly.EventReceiver1
{
    public class EventReceiver1 : SPItemEventReceiver
    {
       public override void ItemAdding(SPItemEventProperties properties)
       {
           base.ItemAdding(properties);
 
           if (!properties.AfterUrl.EndsWith("pdf"))
           {
               properties.ErrorMessage = "You are allowed to upload only PDF Files!";
               properties.Status = SPEventReceiverStatus.CancelWithError;
               properties.Cancel = true;
           }
       }
    }
}
See the the result in action!


Drawback: This will prevent creating sub-folders which doesn't end with PDF! so if you need folder, name it like "folder.pdf" and then rename!