Wednesday, February 20, 2013

How to implement a 'MailTo' Link (html format) in a calculated Column in SharePoint List

For example if you want to show an email link if the category (another column value say AppType) is 'On-Request', and by clicking on that you can open an outlook window to send a request email. 
But you don't want to show the full 'href' link instead just a text "Request" with an html link that will trigger the email. In that case you can use the following method. 

Create a calculated column (say 'Request' for request email). 

Add a content editor web part to the list page and add the following JavaScript. 


<SCRIPT type=text/javascript>
if(typeof jQuery=="undefined"){
var jQPath ="http://ajax.googleapis.com/ajax/libs/jquery/1.3.1/";
document.write("<script src='",jQPath,"jquery.min.js' type='text/javascript'><\/script>");
}
</SCRIPT>

<SCRIPT type=text/javascript>
$(document).ready(function(){
$(".ms-vb2:contains('<DIV')").each(function(){
var tempDIV = document.createElement ("DIV");
tempDIV.style.cursor = "pointer";
tempDIV.innerHTML = $(this).text();
$(this).text("");
$(this).append(tempDIV);
});
});
</SCRIPT>

Now give the following code as value for the calculated column you created: 

=IF([App Type]="On-Request","<DIV><a href='mailto:dinoop@website.com?Subject=Testing'>Request</a></DIV>","")

Now you can see column values as html links. 
The JavaScript function will convert the text to html wherever it finds the 'DIV' tag. 

Tuesday, January 8, 2013

Creating Custom Timer Job in SharePoint 2010

CODE

Open Visual Studio 2010 >File > New >Project >SharePoint 2010>Empty SharePoint Project. >Name it Custom_TimerJob>Ok

Check Deploy as farm solution>Finish

create a class that inherits from the Microsoft.SharePoint.Administration.SPJobDefinition class. To implement this class, you need to create a few constructors and override the Execute() method as following
 
namespace DotnetFinder
{
    class ListTimerJob : SPJobDefinition
    {
         public ListTimerJob()

            : base()
        {

        }

        public ListTimerJob(string jobName, SPService service, SPServer server, SPJobLockType targetType)

            : base(jobName, service, server, targetType)
        {

        }

        public ListTimerJob(string jobName, SPWebApplication webApplication)

            : base(jobName, webApplication, null, SPJobLockType.ContentDatabase)
        {

            this.Title = "List Timer Job";

        }

        public override void Execute(Guid contentDbId)
        {

            // get a reference to the current site collection's content database

            SPWebApplication webApplication = this.Parent as SPWebApplication;

            SPContentDatabase contentDb = webApplication.ContentDatabases[contentDbId];

            // get a reference to the "ListTimerJob" list in the RootWeb of the first site collection in the content database

            SPList Listjob = contentDb.Sites[0].RootWeb.Lists["ListTimerJob"];

            // create a new list Item, set the Title to the current day/time, and update the item

            SPListItem newList = Listjob.Items.Add();

            newList["Title"] = DateTime.Now.ToString();

            newList.Update();

        }
}
}
As you can see this job just add a new item to a ListTimerJob list every time it’s executed
Now that you have the job built> Right click on the Features >Add Feature

Right click on the Feature1 ” you can rename the Feature1 to any name” > Add Event Receiver

As you can see the event Receiver class inherits from the Microsoft.SharePoint.SPFeatureReceiver and This class handles events raised during feature activation, deactivation, installation, uninstallation, and upgrade. But we only need FeatureActivated & FeatureDeactivated event handler to install/uninstall our custom timer job as following
namespace DotnetFinder.Features.Feature1
{
[Guid("9a724fdb-e423-4232-9626-0cffc53fb74b")]
public class Feature1EventReceiver : SPFeatureReceiver
    {
        const string List_JOB_NAME = "ListLogger";
        // Uncomment the method below to handle the event raised after a feature has been activated.

        public override void FeatureActivated(SPFeatureReceiverProperties properties)
        {
            SPSite site = properties.Feature.Parent as SPSite;

            // make sure the job isn't already registered

            foreach (SPJobDefinition job in site.WebApplication.JobDefinitions)
            {

                if (job.Name == List_JOB_NAME)

                    job.Delete();

            }

            // install the job

            ListTimerJob listLoggerJob = new ListTimerJob(List_JOB_NAME, site.WebApplication);

            SPMinuteSchedule schedule = new SPMinuteSchedule();

            schedule.BeginSecond = 0;

            schedule.EndSecond = 59;

            schedule.Interval = 5;

            listLoggerJob.Schedule = schedule;

            listLoggerJob.Update();

        }

        // Uncomment the method below to handle the event raised before a feature is deactivated.

        public override void FeatureDeactivating(SPFeatureReceiverProperties properties)
        {
            SPSite site = properties.Feature.Parent as SPSite;

            // delete the job

            foreach (SPJobDefinition job in site.WebApplication.JobDefinitions)
            {

                if (job.Name == List_JOB_NAME)

                    job.Delete();

            }

}

   }

Before Deploying you should select the right scope of the Feature in other words in which scope you will activate the Feature(Farm,Site,Web,WebApplication) in our case we will activate Feature1 on Site which is mean Site Collection.

Note : if you trying to activate the feature in the wrong scope will get the following error

Now let us deploy our custom timer job >Right Click on Custom_TimerJob project > Click Deploy

Open now your SharePoint site and select ListTimerJob List and you should see something similar to the following image


Our custom timer job is working fine now you can go and check it and modify the schedule as following
Go to SharePoint 2010 central administration >Monitoring >in the Timer Jobs Section Select Review Job Definitions
and you should See our Custom Timer Job

Click on it and you should see Edit Timer Job Page ,Modify Timer Job schedule based on your requirement
Note : you can also modify schedule of your custom Timer Job from the code but you need to add one of the following class in FeatureActviated Event Handler as following

After Specific Minutes use SPMinuteSchedule class
Hourly use SPHourlySchedule class
Daily use SPDailySchedule class
Weekly use SPWeeklySchedule class
Monthly use SPMonthlySchedule class

Configuring Sharepoint 2010 to Accept Incoming Emails


Wouldn’t it be nice to create a list, announcement or a document respository automatically by sending email to Sharepoint Server, whats even better is that you can run a logic behind it by using worklflow and automate business processes as well. A good example would be a service request or a project request where it originates from an email and depending on the contents of the email it filters it out and assigns task to different departments. Well before all of that happens you need to configure Sharepoint first to accept incoming emails and here is a simple way to do it and it only involves 8 easy steps so lets get starting.

1. Add SMTP Feature to your Sharepoint Server

To do that go to your Server Manager by going to Start->Administrative Tools->Server Manager or just type “Server Manager” in the search box. Once in the server manager go to features, then in feature summary click “Add Features”.

Select “SMTP Server” and click “Add Required Role Services”.

2. Install IIS 6 Management Console

Since SMTP Management still uses the old MMC UI you need to install the IIS 6 Management Console, to check whether its installed go to Server Manager->Roles->Web Server(IIS) then under the Role Services you will see whats installed, if its not there then click “Add Role Services”.

Choose the required IIS 6 Management Components, and confirm installation.

Once installed you should see it under Administrative Tools->Internet Information Services (IIS) 6.0 Manager.

3. Setup your SMTP Server

Knowing that Internet Information Services (IIS) 6.0 Manager is installed click on it and start setting up your SMTP.
Go to the SMTP Virtual Server, right click on it and choose properties.

Go to Access then setup Authentication, make sure Anonymous Access is checked then click OK.

Now click Connection, choose “All except the list below” then click OK.

Finally click relay choose “Only the list below” and make sure the item “Allow all computers which successfully authenticate to relay, regardless of the list above” is checked. Click OK then Apply.

4. Take note of where the Email Drop Folder is located

This will be the location where an email message is dropped of first before processing. To go there just below “SMTP Virtual Server” you will see “Domains” and right click on the Domain Name of your server the select properties.

5. Check if SMTP service is running

To check if your SMTP Service is runing type “services.msc” in run command, once Serices Console loads go to “Simple Mail Transfer Protocol (SMTP)”, double click the entry and make sure Startup Type is “Automatic” and start the service. Click Apply and OK.

6. Configure incoming e-mail settings in Sharepoint 2010

Now go to your Sharepoint Central Administration. Once there go to System Sttings->Configure incoming e-mail settings.

Configure the following options:
  • Enable sites on this server to receive e-mail? -> Yes
  • Settings mode: -> Automatic
  • Use the SharePoint Directory Management Service to create distribution groups and contacts? -> No
  • E-mail server display address: -> YOURSERVER.yourdomain.com, this is the default
  • Safe E-Mail Servers -> Accept mail from all e-mail servers

Click OK and it processes on the background and of of the processes involved is setting up security properties on the Drop Folder which I mentioned on step 4, sometimes that fails (very rarely this happens) so it best to check if that indeed worked by going to the Security Properties of the Drop Folder.
Make sure the security properties are such:
  • WSS_Admin_WPG – Full Control
  • WSS_WPG – Read & Execute / List folder Contents / Read

7. Configure your Sharepoint List Incoming e-mail settings

Now configure your list to accept that emails, to do that choose a list (It will only work on some list types), Calendar or Document Library then go to Communications->Incoming e-mail settings.

Then set up the following
  • Allow this list to receive e-mail? -> Yes
  • E-mail address: > The email address you want, this will be automatically routed once it hits the domain so no need to create it on Exchange
  • Save e-mail attachments? -> Yes, if you want to
  • Save original e-mail? -> Yes, if you want to
  • Save meeting invitations? -> Yes, if you want to
  • E-mail security policy: -> Accept e-mail messages from any sender

Click OK, now your all done, all you have to do it test.

8. Testing Time

Send and email to the one you configured on step 7

Check the Drop Folder mentioned in Step 4 and an email (.eml) file will be there while its being processed.

Once it disappread check your list and the email should be there.


 Event Handler Example

Requirement: In a Project collaboration SharePoint site, had a requirement to Allow users to upload only PDF files to a Document library and prevent all other files from being uploaded.

Solution: Our requirement is basically to prevent files being uploaded other than PDF, Isn't it? So lets jump to visual studio and create a Event Receiver in SharePoint to prevent all other file types.

How to Create a Event Receiver in SharePoint 2010?
Compared with MOSS 2007, Creating Event receivers in SharePoint 2010 is very easy With Visual Studio 2010. Here are the steps:

1. Create a New Visual Studio Project, Choose SharePoint >> 2010 >> Event Receiver >> Give it a Name. Say "Crescent.ProjectSites.AllowPDFOnly"

2. Make it as a Farm solution, choose the event receiver properties as in the below screen.

3. On clicking "Finish" button, Visual Studio will create the project structure as:

4. Now, in the Elements.xml file, change the ListTemplateID="101" (Which means all document Libraries) to ListURL="RelativePathOfDocLibrary" say: ProjectDocuments.

Change the <Receivers attribute
5. Update the Event receiver ItemAdding section's code as below:

?
1
2
3
4
5
6
if (!properties.AfterUrl.EndsWith("pdf"))
            {
                properties.ErrorMessage = "You are allowed to upload only PDF Files!";
                properties.Status = SPEventReceiverStatus.CancelWithError;
                properties.Cancel = true;
            }


So, The complete code would be:
?
1
2
3
4
5
6
7
8
9
10
11
12
13
14
15
16
17
18
19
20
21
22
23
24
using System;
using System.Security.Permissions;
using Microsoft.SharePoint;
using Microsoft.SharePoint.Security;
using Microsoft.SharePoint.Utilities;
using Microsoft.SharePoint.Workflow;
 
namespace Crescent.ProjectSites.AllowPDFOnly.EventReceiver1
{
    public class EventReceiver1 : SPItemEventReceiver
    {
       public override void ItemAdding(SPItemEventProperties properties)
       {
           base.ItemAdding(properties);
 
           if (!properties.AfterUrl.EndsWith("pdf"))
           {
               properties.ErrorMessage = "You are allowed to upload only PDF Files!";
               properties.Status = SPEventReceiverStatus.CancelWithError;
               properties.Cancel = true;
           }
       }
    }
}
See the the result in action!


Drawback: This will prevent creating sub-folders which doesn't end with PDF! so if you need folder, name it like "folder.pdf" and then rename!

Friday, November 16, 2012

SharePoint 2010 14\TEMPLATE directory

TEMPLATE folder is one of the most important file folder of SharePoint where the templates, pages, masterpages will reside.
We will check the breakdown structure of directory and what each folder is meant for in SharePoint.Understanding this folder structure is important to get clear picture on, how and where SharePoint will house our deployed items.

TEMPLATE Directory

The installation path of the TEMPLATE directory will be

[root directory]:\Program Files\Common Files\Microsoft Shared\Web Server Extensions\14\TEMPLATE

Following is image of TEMPLATE directory breakdown structure in SharePoint 2010
TEMPLATE folder structure

1033

This sub-directory contains templates for various documents, XML files, and workflows.
This number corresponds to the language localization for English.
If SharePoint is installed with other languages being primary, the number will be different.

ADMIN

The ADMIN sub-directory contains ASP.NET server pages that correspond to administrative
tasks. Most of them will be accessed through the Central Administration site.

CONTROLTEMPLATES

This is one of the common sub-directory used by many. This contains ASP.NET user controls that are utilized by SharePoint.Also while SharePoint customization, folders will be deployed to house the project related files.
For example, if we create any visual web parts the user controls will be deployed as folders in this sub-directory.

DocumentTemplates

The only thing stored in this directory is the standard ASP.NET server page for wikis.

FEATURES

The FEATURES sub-directory contains 250+ folders, which represent the core features of SharePoint 2010.
Each of these folders contain a Feature.xml file, which identifies to SharePoint 2010 several characteristics such as the identity, scope, resources and manifest location of the feature. SharePoint customization deployed as features will be deployed to this sub-directory.

GLOBAL

This sub-directory houses the standard ASP.NET master pages that deploy with SharePoint
2010, such as the v4, default, and minimal master pages.
Also here are global templates for site definitions, views, and schema for list templates.

IDENTITYMODEL

This sub-directory contains default login pages for the different types of authentication
models, such as Forms, Windows, Trust, and Card.

IMAGES

This sub-directory houses all of the standard images for the SharePoint product.
If you have images deployed as part of customized solutions, by default they will
be deployed as sub-folders of this sub-directory.

LAYOUTS

The LAYOUTS folder is the folder that contains a large portion of the ASP.NET server
pages that are used in the SharePoint product.
You can reference this directory from within a SharePoint site by using a format similar to the following: http://mysite/_layouts/viewlsts.aspx

Pages

Only three ASP.NET server pages are stored in this folder, named form, viewpage,
and webfldr.

Scenarios

This sub-directory contains wizard-style pages, used in some of the different services
with greater complexity, such as BCS, ProfileServiceApplication, and joining the
farm with a particular web server.

Site Templates

This sub-directory contains the site templates for the different built-in SharePoint
2010 web templates.

SQL

This sub-directory contains SQL table creation scripts for tables associated with
various types of SharePoint 2010 databases. Many of the services database creation
scripts are here, such as the UsageDB, the Diagnostics DB, and Configuration DBs.
Also stored here are upgrade scripts to upgrade from a SharePoint 2007 solution
to a SharePoint 2010 solution.

THEMES

This sub-directory houses the 23 built-in themes or looks that are installed with
SharePoint 2010.

XML

The XML sub-directory contains XML schema and document files related to various
configurations in SharePoint.

Retrieving List Items with CAML Query - Examples


If you need to retrieve items from a list when developing web parts, application pages or custom field types you can best use the SPQueryobject from the SharePoint object model. This object is located in the Microsoft.SharePoint namespace of the Microsoft.SharePoint.dll located in the Global Assembly Cache.

Instantiate the object as follows:
SPQuery query = new SPQuery();
 
The most important property is the Query property, which needs to be set to your CAML query:

string camlquery = "<OrderBy><FieldRef Name='Country' /></OrderBy><Where>"
    + "<Eq><FieldRef Name='LastName' /><Value Type='Text'>Smith</Value></Eq>"
    + </Where>";
query.Query = camlquery;
 
At this point you can execute the query on your list:
SPListItemCollection listItemsCollection = list.GetItems(qry); 

Get data in datatable

A small remark with the GetItems method of the SPList instance: this method returns a collection of type SPListItemCollection. It is possible that it is easier working with a DataTable. In that case you can execute the query as follows:


DataTable listItemsTable = list.GetItems(qry).GetDataTable(); 

View fields property

The query will not only return all list items that have their last name set to Smith, but also all columns of each list item. In cases you work with large lists it can be important to retrieve a subset of list items containing only the columns you need. In that case you will have to set the ViewFields property of the SPQuery object. 

You can do this by specifying all columns you want to see returned:


qry.ViewFields = "<FieldRef Name='FirstName' /><FieldRef Name='LastName' />";
query.ViewFieldsOnly = true;
 
This will return the first name and the last name of the retrieved employees, but also the system fields like the ID and the Created date.

The major disadvantage of the SPQuery object is that you can query only one list. If you want to query more than one list you will have to use the SPSiteDataQuery. More on this object in a later article because it earns special attention.
It is common knowledge by now but let me remind you that it’s always a good idea to use SPQuery to retrieve a subset of list items. You can loop through the list item collection to find the list items that match your needs but this will have a serious negative impact on the performance of your work.

IncludeMandatoryColumns

When this Boolean property is set to True, the result set will not only return the columns as defined in the ViewFields property, but also the columns that you defined in the list as required.
When working with the SPQuery object:
qry.IncludeMandatoryColumns = true;
When working with the GetListItems method of the Lists.asmx web service:

XmlNode queryOptionsNode = camlDocument.CreateElement("QueryOptions");
queryOptionsNode.InnerXml =
    "<IncludeMandatoryColumns>True</IncludeMandatoryColumns>";

RowLimit

Setting this property limits the number of rows returned in the result set.
When working with the SPQuery object:
qry.RowLimit = 10;
 

Example: 


 using (SPSite site = new SPSite("http://localhost"))
         {
            using (SPWeb web = site.OpenWeb())
            {
SPList List = oWebsiteRoot.Lists["Tasks"];
               // Build a query. 
 SPQuery query = new SPQuery();
 
Query.Query = "<Where><Eq><FieldRef Name='Status'/>" +
    "<Value Type='Text'>Completed</Value></Eq></Where>";

 query.ViewFields = string.Concat(
                                   "<FieldRef Name='AssignedTo' />",
                                   "<FieldRef Name='LinkTitle' />",
                                   "<FieldRef Name='DueDate' />",
                                   "<FieldRef Name='Priority' />"); 
 
query.ViewFieldsOnly = true;
query.RowLimit = 10; 
 
SPListItemCollection collListItems = List.GetItems(query);
DataTable listItemsTable = List.GetItems(query).GetDataTable(); 
}
} 

Another Example - Using Sharepoint Client Object Model: 

Four properties of ListItem are not available by default when you return list items: 
DisplayName, EffectiveBasePermissions, HasUniqueRoleAssignments, and RoleAssignments
Use Include method to get them. 
Only the specified properties are available after query execution.
Therefore, you receive a PropertyOrFieldNotInitializedException
if you attempt to access other properties beyond those that have been specified. 
In addition, you receive this error if you attempt to use properties such as 
ContentType or ParentList to access the properties of containing objects.

using System;
using Microsoft.SharePoint.Client;
using SP = Microsoft.SharePoint.Client;

namespace Microsoft.SDK.SharePointServices.Samples
{
    class RetrieveListItems
    {
        static void Main()
        {
            string siteUrl = "http://MyServer/sites/MySiteCollection";

            ClientContext clientContext = new ClientContext(siteUrl);
            SP.List oList = clientContext.Web.Lists.GetByTitle("Announcements");

            CamlQuery camlQuery = new CamlQuery();
            camlQuery.ViewXml = "<View><Query><Where><Geq><FieldRef Name='ID'/>" +
                "<Value Type='Number'>10</Value></Geq></Where></Query><RowLimit>100</RowLimit></View>";
            ListItemCollection collListItem = oList.GetItems(camlQuery);

clientContext.Load(collListItem);
OR
clientContext.Load(collListItem,
                 items => items.Include(
                    item => item.Id,
                    item => item.DisplayName,
                    item => item.HasUniqueRoleAssignments));
 
 
 clientContext.ExecuteQuery();

            foreach (ListItem oListItem in collListItem)
            {
                Console.WriteLine("ID: {0} \nTitle: {1} \nBody: {2}", oListItem.Id, oListItem["Title"], oListItem["Body"]);
            }
        }
    }
}
 

Retrieving specific fields from a specified number of items


The following example shows how to retrieve specific fields from only the first five items in a list. Because only the Title and Body columns are specified, these are the only properties that are available.


using System;
using System.Linq;
using Microsoft.SharePoint.Client;
using SP = Microsoft.SharePoint.Client;

namespace Microsoft.SDK.SharePointServices.Samples
{
    class RetrieveSpecificItemsFields
    {
        static void Main()
        {
            string siteUrl = "http://MyServer/sites/MySiteCollection";

            ClientContext clientContext = new ClientContext(siteUrl);
            SP.List oList = clientContext.Web.Lists.GetByTitle("Announcements");

            CamlQuery camlQuery = new CamlQuery();
            ListItemCollection collListItem = oList.GetItems(camlQuery);

            clientContext.Load(
                collListItem,
                items => items.Take(5).Include(
                item => item["Title"],
                item => item["Body"]));

            clientContext.ExecuteQuery();

            foreach (ListItem oListItem in collListItem)
            {
                Console.WriteLine("Title: {0} \nBody: {1}\n", oListItem["Title"], oListItem["Body"]);
            }
        }
    }
}

Retrieving items from all the lists in a Web site 


using System;
using System.Linq;
using Microsoft.SharePoint.Client;
using SP = Microsoft.SharePoint.Client;

namespace Microsoft.SDK.SharePointServices.Samples
{
    class RetrieveFirstTenItemsAllLists
    {
        static void Main()
        {
            string siteUrl = "http://MyServer/sites/MySiteCollection";

            ClientContext clientContext = new ClientContext(siteUrl);
            ListCollection collList = clientContext.Web.Lists;

            clientContext.Load(
                collList,
                lists => lists.Where(
                    list => list.Hidden == false).Include(
                    list => list.Title,
                    list => list.Items.Take(10)));

            clientContext.ExecuteQuery();

            foreach (SP.List oList in clientContext.Web.Lists)
            {
                string listTitle = oList.Title;
                int itemCount = oList.Items.Count;

                Console.WriteLine("List {0} returned with {1} items", listTitle, itemCount);
            }
        }
    }
}

CAML Query tutorial for SharePoint 

  •    CAML - Collaborative Application Markup Language
  •   XML- Extensible Markup Language based query language
       CAML:   Used to perform a query operation against SharePoint Lists

How SharePoint List Items are retrieved?

SharePoint List data can be retrieved in any one of the following ways:
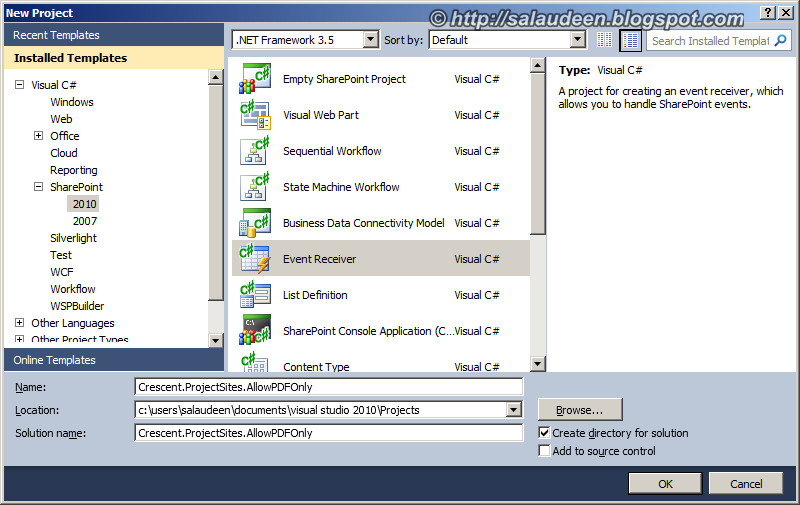
1. Using the SharePoint object model – used when code runs on the server         (Example: Developing a web part or an application page)
2. Using the SharePoint Lists web service – used when your code doesn’t run on the server where the SharePoint is installed (Example: Developing a windows application)
3. Using Power shell –used mostly by the ADMIN of the SharePoint when they quickly want to retrieve some information from the SharePoint site

How does CAML query looks like?

As I already mentioned, it is XML based query language and it contains tags in it. The root element of the CAML query root element is Query. But it is not necessary to use Query element in the query you form.
Within the Query element you have two elements possible:
1. Where   – to filter the data
2. OrderBy – to categorize the data
A simple structure of the CAML query is as follows:
<Query>
          <Where>
                   <Eq>
                             <FieldRef Name=”FieldName” />
                             <Value Type=”DataType”>Value</Value>
                   </Eq>
          </Where>
          <OrderBy>
                             <FieldRef Name=”FieldName” />
                             <FieldRef Name=”FieldName” />
          </OrderBy>
</Query>

Refer: Query Schema Elements


Operators in CAML Query

From the above structure, we came to know that it uses Where and OrderBy elements to retrieve the data from the list.
Let us know about the operators present in the CAML query and its usage:

Inside the Where element

1. Logical Operators - AND, OR
2. Comparison Operators - Listed Below in the table
AND – Which takes two conditions are satisfied
OR – Which takes when either of the conditions is satisfied

Comparison Operators
Inside the OrderBy/GroupBy element

OrderBy – Which orders or sort the data depends upon the field (FieldRef element) given.
GroupBy – Which groups the data depends upon the group by field (FieldRef element) given.

Examples
Logical & Comparison Operators

Use of AND, Gt, Leq
<Query>
<Where>
<And>
<Gt>
<FieldRef Name="Quantity" />
<Value Type="Number">0</Value>
</Gt>
<Leq>
<FieldRef Name="Price" />
<Value Type="Number">2000</Value>
</Leq>
</And>
</Where>
</Query>
Use of OR, Gt, Leq
<Query>
<Where>
<Or>
    <Gt>
<FieldRef Name="Quantity" />
<Value Type="Number">0</Value>
    </Gt>
                     <Leq>
  <FieldRef Name="Price" />
<Value Type="Number">2000</Value>
    </Leq>
               </Or>
       </Where>
</Query>
Use of BeginsWith, Leq
<Query>
<Where>
<And>
     <BeginsWith>
 <FieldRef Name="Title" />
 <Value Type="Text">M</Value>
     </BeginsWith>
     <Leq>
    <FieldRef Name="Quantity" />
<Value Type="Number">1000</Value>
     </Leq>
</And>
</Where>
<OrderBy>
<FieldRef Name="Price" Ascending="False" />
</OrderBy>
</Query>

OrderBy Operator
 
<Query>
<Where>
<Or>
   <Gt>
<FieldRef Name="Quantity" />
<Value Type="Number">0</Value>
  </Gt>
    <Leq>
<FieldRef Name="Price" />
<Value Type="Number">2000</Value>
  </Leq>
</Or>
</Where>
<OrderBy>
<FieldRef Name="Price" Ascending="True" />
</OrderBy>
</Query>


CAML Query


  • A caml query is build in two parts.
    • 1) Sort
    • 2) Filter
  • Sort part is the sorting based on some columns
  • Filter part is the where clause of the CAML query
  • In order to build up the XML for the CAML we create the where clause as follows:
    • Write the where clause just as you write in sql
    • Find out the operators such as =, <=, <,> etc.
    • Find out the keywords for these operators in CAML language. For example = is eq, < is lt and so on.
    • Break the sql string such that the operator comes first and then comes the operands. Continue this till the whole string is completed in this fashion.
    • Replace the operators with the keywords in CAML language.
    • Example: where column1=”a” and column2=”b” and column3 like ‘%c%’
    • => where (column1=”a” and column2=”b”) and column3 like ‘%c%’
    • => where and (column1=”a” and column2=”b”) (column3 like ‘%c%’)
    • => where and (and (column1=”a” column2=”b”) column3 like ‘%c%’)
    • => where and and (= column1 a column2 b) contains column3 c
    • => where and and eq column1 a eq column2 b contains column3 c
    • => <where>
<and>
          <and>
                   <eq>
                             <FieldRef name=”Column1” />
                             <Value Type=string>a</Value>
                   </eq>
                   <eq>
                             <FieldRef name=”Column2” />
                             <Value Type=string>b</Value>                                 
 </eq>
          </and>
          <contains>
                   <FieldRef name=”Column3” />
                   <Value Type=string>c</Value>
          </contains>
</and>
                           </where>

Download CAML Query Builder here

Refer: Sharepoint-works